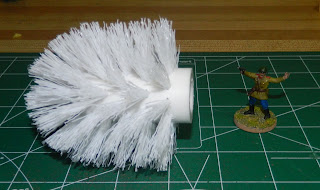
I am happy with my scouring pad trees, but the other day I was in a dollar store and saw a cheap Toilet brush and had a wild idea.
It took less than 20 minutes for the wild idea to reach a point that I thought, with a bit more effort I could make something that would look acceptable.
My first attempt was with just laying some woodlands scenics flocked poly-fibre over the bristles and it looked pretty good, Then I thought these look like they will make passable K&M like trees, with some flock added. So I ripped off the poly-fibre applied some spray glue, then sprinkled flock on it and it looked much better, than the poly-fibre.
 |
| Poly fiber on the left, just a coarse flock on the right. The 28mm Soviet Soldier is for scale. |
Toilet brush
Spray adhesive
Coarse flock (I used homemade, coloured sawdust)
Hot glue (and glue sticks)
Black or dark brown spray paint
Brown and green acrylic paint
Heat gun
2.5"-3" circular MDF base
1 Roofing nail per tree
Razor saw
Basing materials
First go to your local dollar store, and purchase 1 or more toilet brushes (it's just as easy to make one or more than one). My dollar store also had spray adhesive on the shelves, so I bought a can of that for $4.
Remove the brush from its packaging and throw the stand and wrapping away.
Give your brush a bad haircut, so the final tree will look a little more realistic.
Whittle the bottom of the brush head to remove the straight edge.
I found while whittling the bottom made the finished product look a wee bit better, I needed an even better way to hide the bottom of the brush. My first thought was drill some sloping holes then stuff bristles into them, then affix with hot glue, which would hide the bottom, but that's a lot of work. I then decided to heat the bottom bristles enough so they would droop. What I eventually was a combination of heat gun drooping and scouring pad off cuts glued to the bottom and painted brown.
Re-attach the handle and with your heat gun and gently melt the bottom bristles so they droop, set your heat gun to it lowest setting and start by hold it 2 feet below your tree and slowly reduce the distance, don't get too close or you will shrivel the bristles. You could try using a candle but I have a heat gun so i just used that (a hairdryer didn't get the bristles hot enough to sag).
Spray the head of the brush black (or brown), you could paint the handle as well, but since it will be covered with glue, there is no point.
Spray the painted brush with spray adhesive. Sprinkle the flock on the bristles and let it dry. The messy part is sealing the flock, so most of it will stay on the tree. I used spray lacquer but that made the flocking brittle, so I am leaning to either watered down Mod Podge or Future acrylic floor polish.
After the tree canopy is flocked it is time to start on the trunk and the base. Cut the handle to 2" length and hot glue it to your 3" MDF base.
Initially I just glued the handle to the base with a blob of hot glue then I decided it needed extra strength so I drilled a hole through the base, countersink the hole on the bottom of the base and push a Roofing nail through, then glue the handle onto the nail, The handles of the brushes are hollow (but if not drill a hole in the handle).
 |
| Underside of the base with its counter sunk hole |
 |
| Roofing nail awaiting base. |
 |
| Roofing nail through the base |
 |
| Being held in place. |
Finish your tree's base as you want.
 |
| 28mm Soviets moving though the forest |


No comments:
Post a Comment